Hallo und herzlich willkommen zum Februar Block des 6 Köpfe 12 Blöcke Quilt Alongs, schön dass du hier bist!
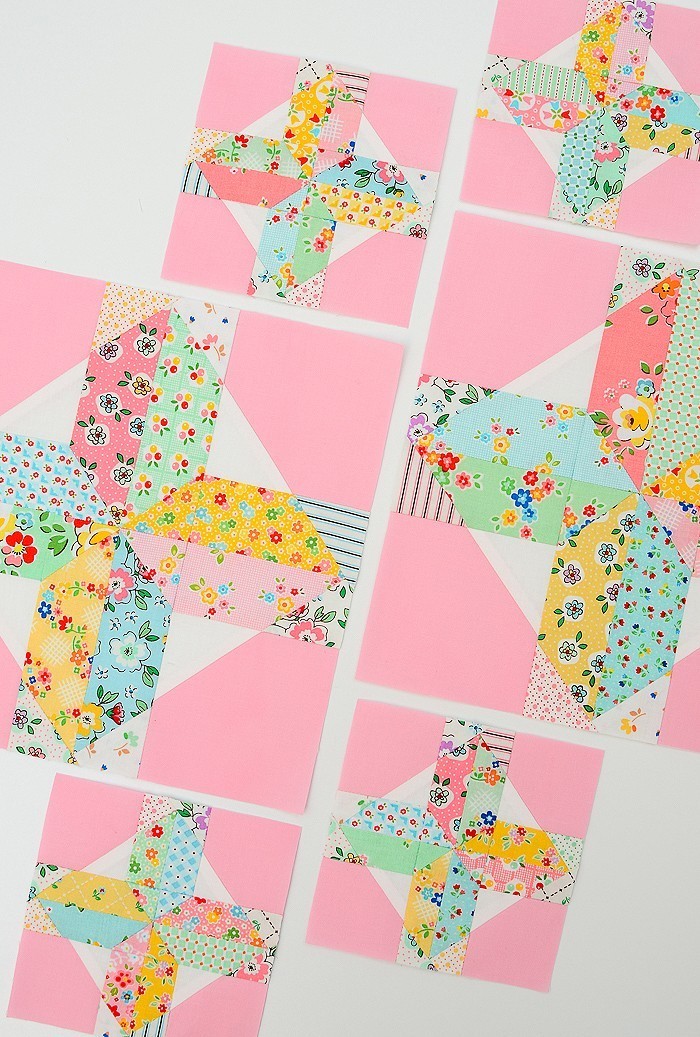
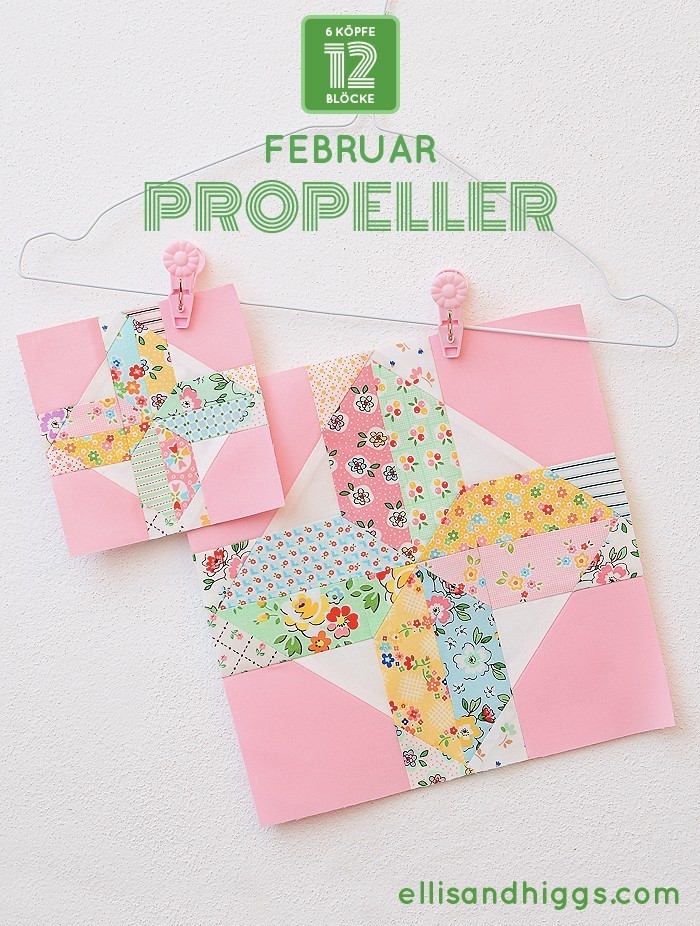
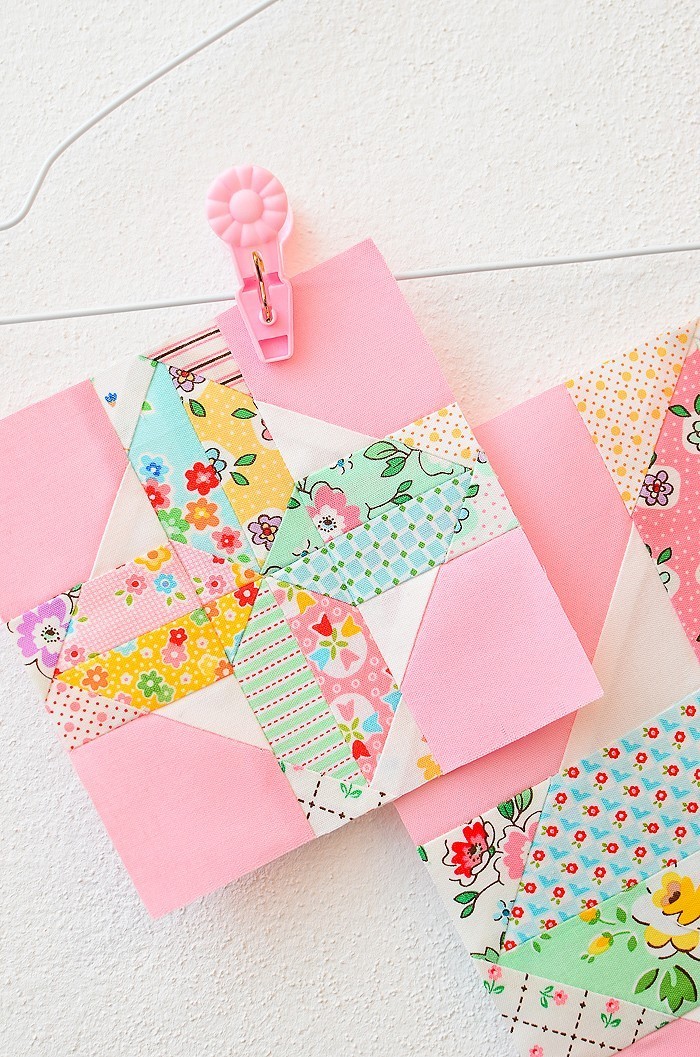
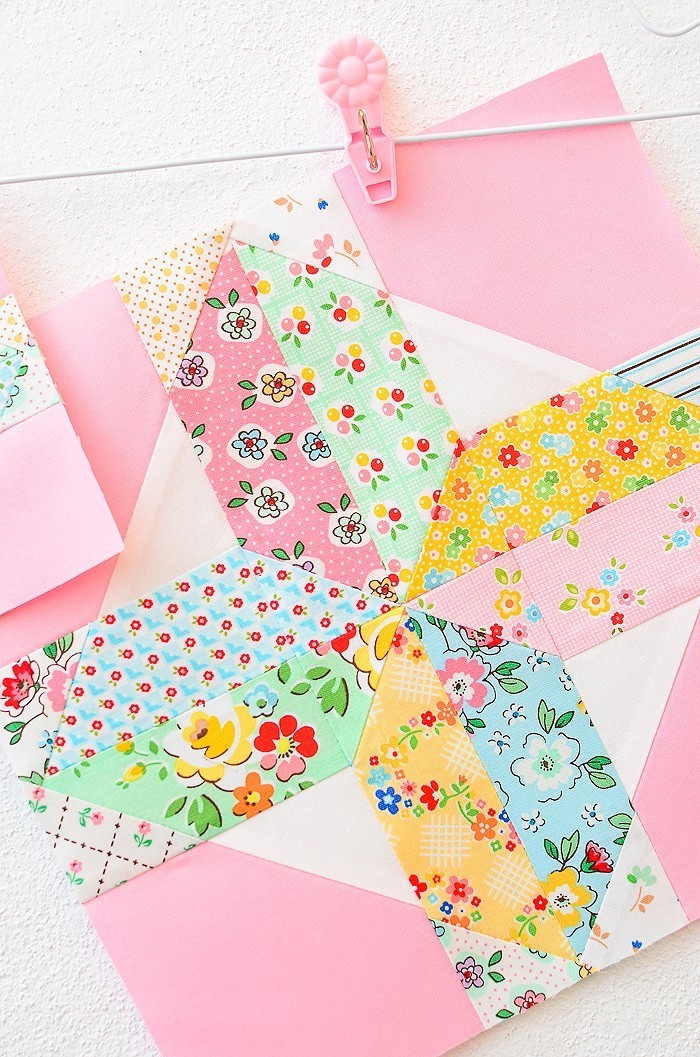
Diesen Monat nähen wir den Propeller Quilt Block und zwar in zwei verschiedenen Größen! Die unvollendete Grafik unseres Quilts hast du ja schon gesehen und dir sicher gedacht, dass es heute etwas anders zugehen wird, als im Januar bei Gesine! Heute nähen wir zwei Blöcke in der mittleren Größe von 10″ und vier 5″ Winzlinge! “Oh nein” denkst du jetzt, “das schaffe ich nie” – keine Angst, wie immer gibt es eine ausführliche Schritt für Schritt – Anleitung und ich stehe dir mit allen meinen Tipps und Tricks zur Seite. Und zur allergrößten Not gibt es eine Alternative für den kleinen Block, falls er dir für den Anfang zuviel sein sollte!
Wenn du mir schon eine Weile folgst, dann weißt du vielleicht, dass Rosa meine Lieblingsfarbe ist – ich habe lange überlegt, wie ich diesen Quilt gestalten soll und bin einfach meinem Bauch gefolgt (natürlich werde ich wieder mit Stoffen aus allen meinen Kollektionen arbeiten). Ich versuche mich immer wieder dagegen zu wehren und denke, ich müsste mal öfter der modernen Linie folgen, aber ich mags halt einfach romatisch… Und mit dieser Mischung aus Pastellfarben und Low Volume Mustern mit Rosa kombiniert (ganz wie diese schönen, antiquen Stücke) wird mein 2019er Quilt ein absoluter Traum! Hier kannst du einen Blick auf meinen Januar Block werfen. In diesem Stil werde ich weitermachen, schön scrappy (was unendlich viel mehr Arbeit bedeutet, aber egal!) pastel & dreamy…
Unten findest du noch allgemeine Infos zu diesem Quilt Along, aber dann geht’s auch schon los, viel Spaß mit dem Tutorial!
Hello and welcome to block number two of the 6 Köpfe 12 Blöcke Quilt Along – the wonderful Propeller Quilt Block! This month we will be making our block in two different sizes! You’ve probably already seen the incomplete quilt diagram above and have guessed that things will be a little bit different than in January – today we’ll be making two 10″ and four tiny 5″ blocks. Don’t fret if you’re still in the beginning stages, as always I will provide detailed step-by-step instructions and will share all my tips and tricks to help you get along! At a pinch there’s an easy alternative for the 5″ block.
If you’ve been following me for a while, you probably know that my favorite color is pink. It took me ages to come up with an idea for this years quilt (I will of course be sewing with fabrics from all my fabric lines again). Sometimes I think, I should be more open towards the modern asthetic, but I just love everything vintage and romantic – and I decided to follow my gut! This scrappy, pastel and dreamy quilt (just like these beautiful antique pieces) will be an all time favorite!
I hope you’ll enjoy my tutorial. If you’re new here, you’ll find more infos about this quilt along below. And now, let’s get started!
6 Köpfe 12 Blöcke – Quilt Along
Du bist neu hier und hast noch nie von den 6 Köpfen gehört? Dieser Quilt Along ist ein Gemeinschaftsprojekt meiner „quilting peeps“ (die du oben auf dem Bild siehst) und mir. Letztes Jahr haben wir einen Row-by-Row Quilt genäht, im Jahr davor einen Quilt mit 12 klassischen Blöcken. Dieses Jahr werden wir unsere Fertigkeiten mit einem Skill Builder Mystery Quilt vertiefen. Wenn du bei diesem Jahresprojekt mitnähen möchtest, dann mach dich am besten vorher auf diesen beiden Seiten schlau:
→ 6 Köpfe 12 Blöcke – ALLGEMEINE INFORMATIONEN und LINKS ZU DEN TUTORIALS
→ 6 Köpfe 12 Blöcke – EINFÜHRUNG und ALLE INFORMATIONEN ZUM QUILT
Are you new here and haven’t heart of the ‚6 Köpfe‘ before? This quilt along is a joint project by me and my quilting peeps (on the image above). Last year we made a row by row quilt and the year before that a quilt with 12 traditional quilt blocks. This year we will move things forward with a skill builder mystery quilt. If you’d like to join us, you can read all about the quilt along here:
→ 6 Köpfe 12 Blöcke – GENERAL INFOS and TUTORIAL LINKS
→ 6 Köpfe 12 Blöcke – INTRODUCTION and INFOS ABOUT THE QUILT
Propeller Quilt Block Tutorial
Block Größen:
Großer Block: unvernäht 10 ½″, vernäht 10″
Kleiner Block: unvernäht 5 ½″, vernäht 5″
Wir nähen insgesamt 2 große Blöcke und vier kleine Blöcke.
Die Nahtzugabe (in den Schnitteilen enthalten!) beträgt ¼″. Gebügelt wird in Richtung der angezeigten Pfeile. Um die Blöcke zu planen, kannst du dir das Ausmalblatt ausdrucken:
Quilt Block sizes:
Large Block: 10 ½″ unfinished , 10″ finished
Small block: 5 ½″ unfinished , 5″ finished
We will be sewing a total of 2 large blocks and four small blocks.
The ¼″ seam allowance is included in all pattern pieces. Press the seams as shown by arrows. You can print out the coloring page to plan your blocks.
→ AUSMALBLATT / COLORING PAGE
Hilfreiche Tipps / Helpful tips
Bitte lies dir das Tutorial in Ruhe einmal komplett durch, bevor du beginnst.
Please read all instructions thoroughly before you begin.
Die Blöcke werden mit Hilfe von Easy Corner Triangles hergestellt, eine Technik, die ich auch häufig in meinen Patchwork Anleitungen verwende. Hier eine Kurzanleitung:
The blocks are assembled by using the Easy Corner Triangles Method – a technique I often use in my quilt patterns. Here’s a quick guide:
→ EASY CORNER TRIANGLES METHODE / METHOD
Der 5″ Block ist nicht ganz einfach zu nähen, denn er enthält zum Teil sehr kleine Schnittteile. In diesem Beitrag gebe ich dir einige hilfreiche Tipps zum Patchworken mit kleinen Teilen:
The 5″ block contains some really small pieces and might be a little difficult for beginning quilters – in this blog post I’m giving you helpful tips on how to stitch small pieces:
→ PATCHWORKEN MIT KLEINEN TEILEN / HOW TO STITCH SMALL PIECES
Solltest du gar nicht klarkommen, stelle ich dir im Abschnitt “Zuschnitt / Cutting” einen Alternativblock in 5″ zur Verfügung, der einfacher zu nähen ist. Er wird mit derselben Technik wie der Originalblock zusammengenäht, du kannst dich also auch an der bebilderten Anleitung orientieren.
In case you don’t get along I’ve uploaded instructions for an alternative 5″ block, which is easier to assemble. You’ll find the table in the “Zuschnitt / Cutting” section below.
Materialien / Materials
Stoffe:
- Farbe 1: ca. 1 Fat Quarter
- Farbe 2: ca. 1 Fat Quarter
- Farbe 3: ca. 1 Fat Quarter
- Hintergrundstoff: ca. 1 Fat Quarter
Die Angaben sind großzügig bemessen und erlauben eventuellen Verschnitt.
Fabrics:
- Colour 1: approx. 1 Fat Quarter
- Colour 2: approx. 1 Fat Quarter
- Colour 3: approx. 1 Fat Quarter
- Backgroundfabric: approx. 1 Fat Quarter
I have calculated the amount for the blocks rather generously to allow for cutting errors.
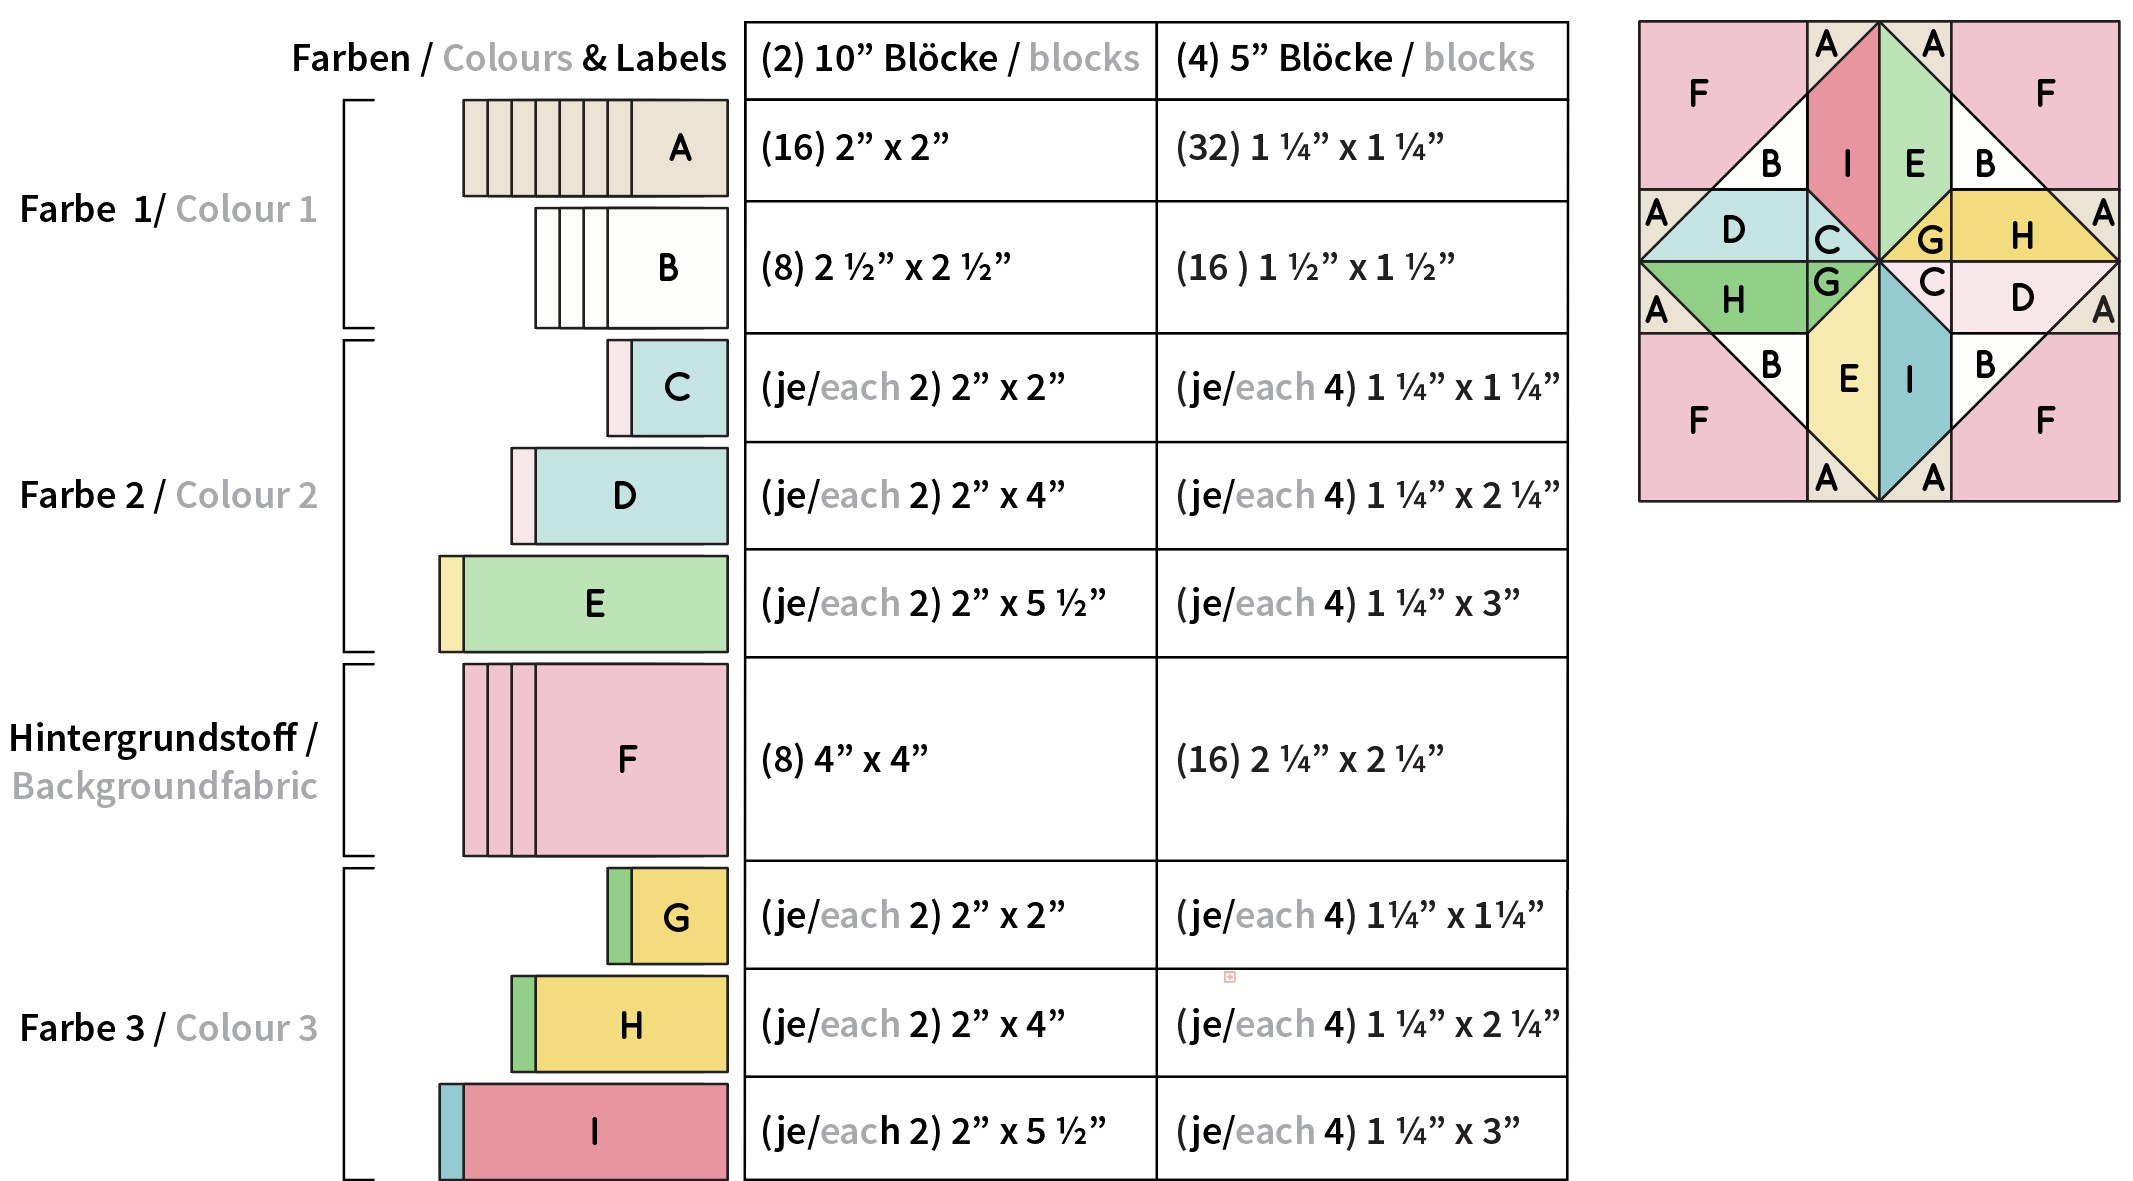
Zuschnitt / Cutting
Tabelle 1 / Table 1:
Dieser Tabelle kannst die die Zuschnitt-Maße und Stofflabels des Propeller Quilt Blocks, wie er in der Gesamtübersicht des Quilts oben dargestellt ist, entnehmen (zum Vergrößern klicken).
Here are the cutting instructions and labels of the Propeller Quilt Block as displayed in the original quilt diagram above (click to enlarge).

Tabelle 2 / Table 2:
Dieser Tabelle kannst du die Zuschnitt-Maße und Stofflabels des Propeller Quilt Blocks, wie ich ihn farblich gestaltet habe, entnehmen (zum Vergrößern klicken).
Here are the cutting instructions and labels of the Propeller Quilt Block with the colours I have chosen for my blocks (click to enlarge).
Die einfache 5″ Block Alternative / The easy 5″ block alternative
Wenn du zu den Quilt-Anfängern gehörst, und dich noch nicht an den kleinen Block herantraust, oder einfach nicht so gut zurechtgekommen bist, habe ich hier eine einfache Alternative für den 5″ Block. Bei der Zusammensetzung kannst du dich an die Anleitung unten halten, sie funktioniert nach dem gleichen Prinzip.
I designed an easy alternative for the 5″ block, in case you’re a beginning quilter, and not sure whether to try the original block. Please follow the instructions below to assemble the block, they are similar to the original block instructions.
→ DER EINFACHE 5″ QUILT BLOCK / THE EASY 5″ QUILT BLOCK
Vorbereitung / Preparation:
Auf die Rückseite der Stoff A, B, C und G Quadrate eine diagonale Linie einzeichnen.
Draw a diagonal line on the back of the Fabric A, B, C und G squares.
Anleitung / Instructions:
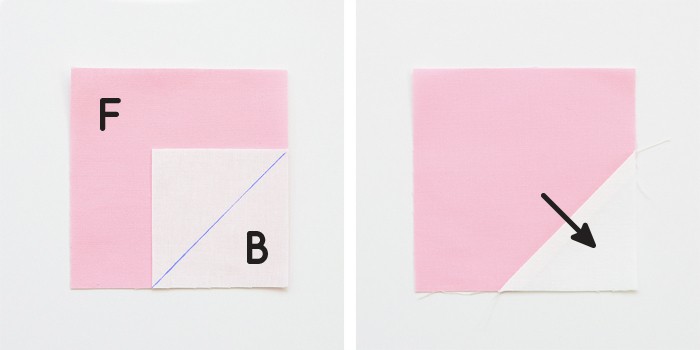 1. Ein Stoff B Quadrat auf die untere rechte Ecke eines Stoff F Quadrats legen, rechte Seiten aufeinanderliegend. Auf der eingezeichneten Linie entlangnähen und den überschüssigen Stoff ¼” von der Naht entfernt abschneiden. Wiederholen und vier Einheiten herstellen.
1. Layer a Fabric B square on the bottom right corner of a Fabric F square, right sides together. Stitch on the drawn line and trim away ¼” from the seam. Repeat and make four units.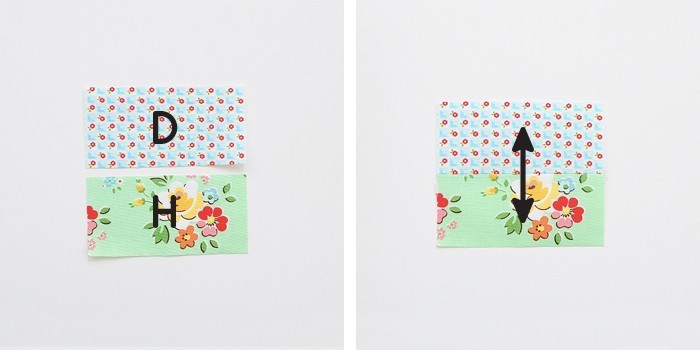 2. Ein Stoff D Rechteck und ein Stoff H Rechteck wie oben dargestellt zusammennähen.
2. Assemble a Fabric D rectangle and a Fabric H rectangle as shown above.
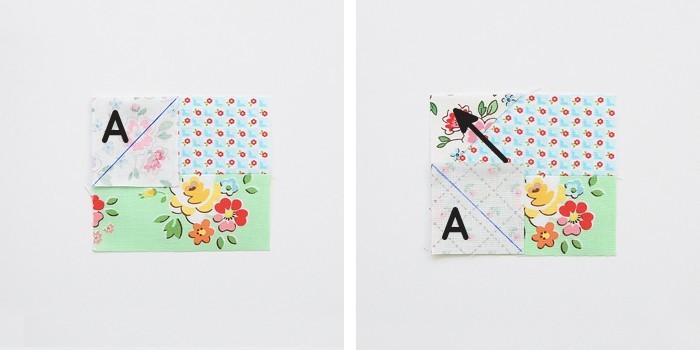 3. Ein Stoff A Quadrat auf die obere linke Ecke der Einheit legen, rechte Seiten aufeinanderliegend. Auf der eingezeichneten Linie entlangnähen und den überschüssigen Stoff ¼” von der Naht entfernt abschneiden. Mit einem Stoff A Quadrat auf der unteren linken Ecke wiederholen…
3. Layer a Fabric A square on the top left corner of the unit, right sides together. Stitch on the drawn line and trim away ¼” from the seam. Repeat with a Fabric A square on the bottom left corner…
 4. umbügeln und…
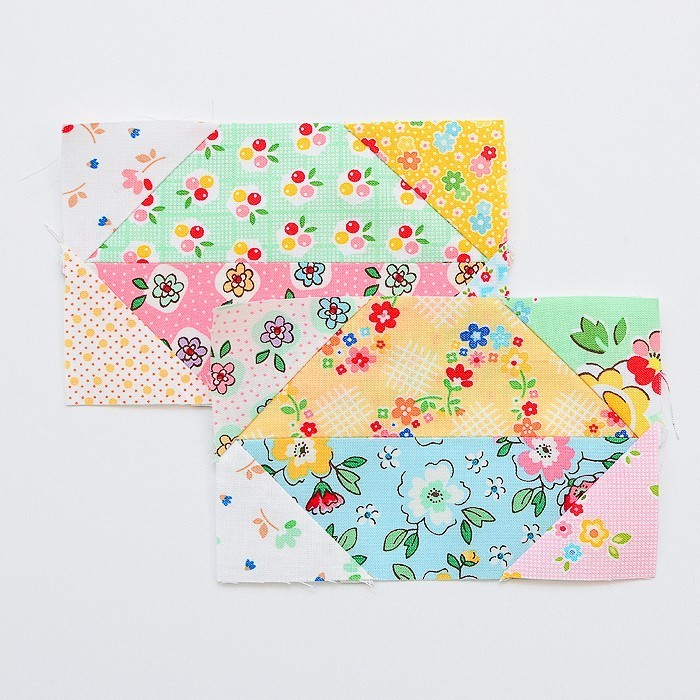
4. iron and… …insgesamt zwei Einheiten herstellen.
…make a total of two units. 5. Ein Stoff E Rechteck und ein Stoff I Rechteck wie oben dargestellt zusammennähen.
5. Assemble a Fabric E rectangle and a Fabric I rectangle as shown above.
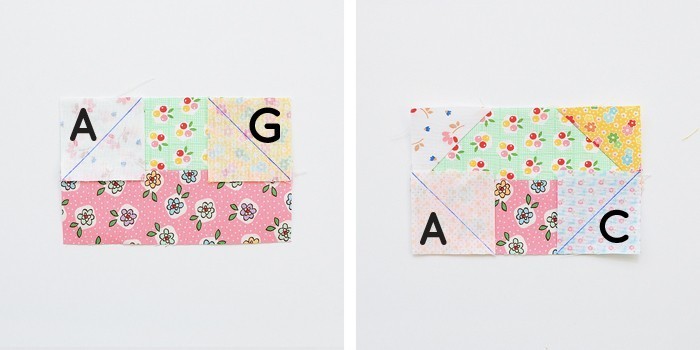
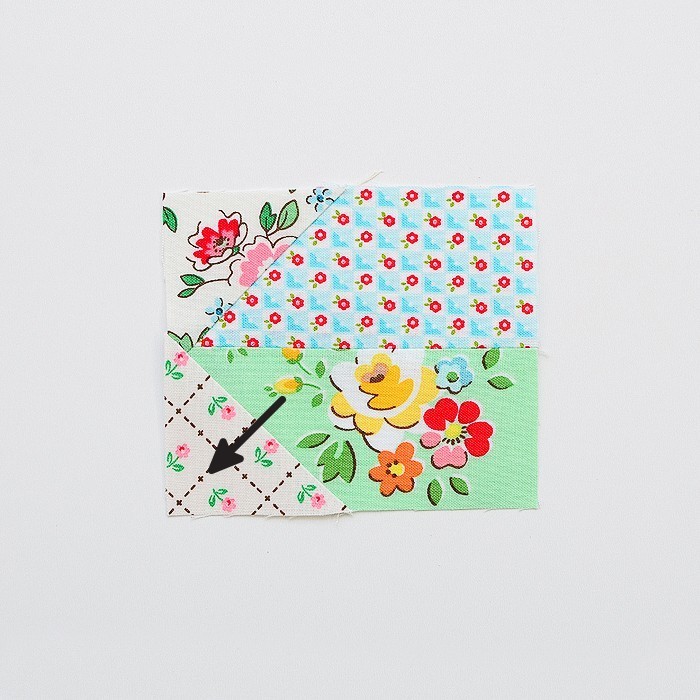
6. Ein Stoff A Quadrat auf die obere linke Ecke der Einheit legen, rechte Seiten aufeinanderliegend. Auf der eingezeichneten Linie entlangnähen und den überschüssigen Stoff ¼” von der Naht entfernt abschneiden. Mit einem Stoff G Quadrat auf der oberen rechten Ecke, einem Stoff A Quadrat auf der unteren linken Ecke und einem Stoff C Quadrat auf der unteren rechten Ecke wiederholen…
6. Layer a Fabric A square on the top left corner of the unit, right sides together. Stitch on the drawn line and trim away ¼” from the seam. Repeat with a Fabric G square on the top right corner, a Fabric A square on the botton left corner and a Fabric C square on the bottom right corner…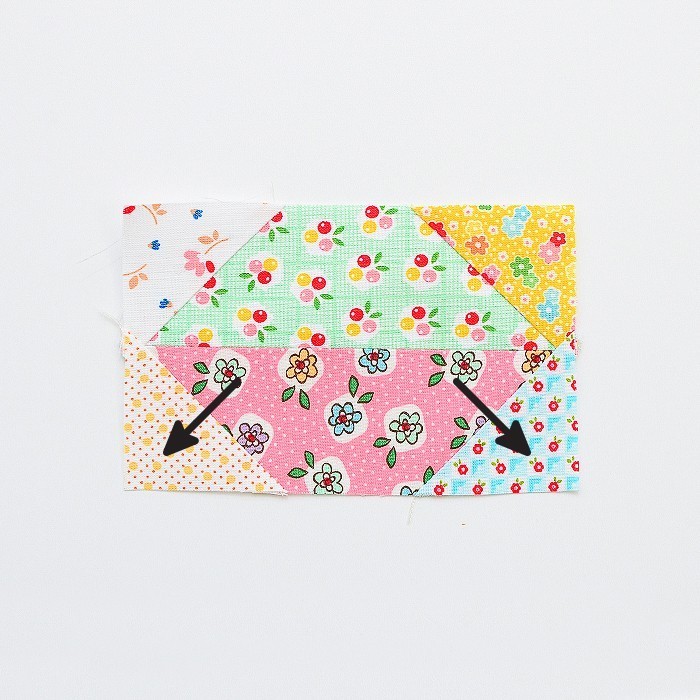
7. umbügeln und…
7. iron and…
…insgesamt zwei Einheiten herstellen.
…make a total of two units.
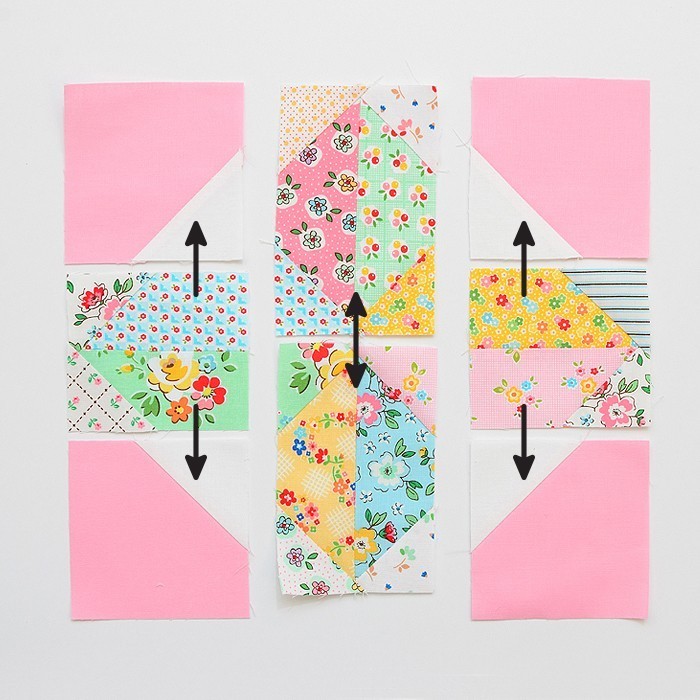
8. Die Einheiten wie oben dargestellt platzieren und zu drei Streifen zusammennähen.
8. Place and assemble the units into three columns as shown above.

9. Die drei Reihen zusammennähen…
9. Assemble the three columns and…
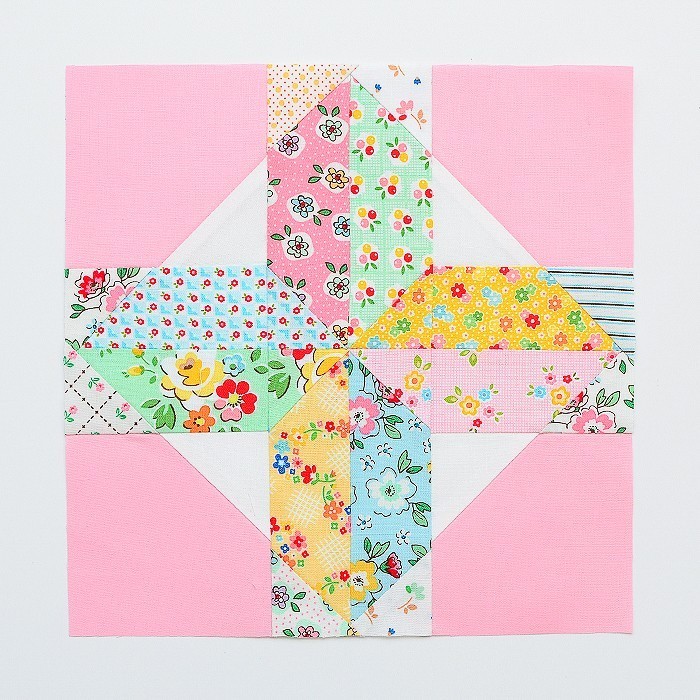
… und fertig! Eure Blöcke sollten 10 ½″ und 5 ½″ groß sein.
…you’re done! Your blocks should measure 10 ½″ and 5 ½″.
Ich hoffe es hat dir Spaß gemacht den Propeller Quilt Block zu nähen und ich freue mich sehr schon drauf, deine Blöcke zu sehen! Über meinen Newsletter bleibst du immer auf dem neuesten Stand über alles, was hier passiert – als Abonnent kommst du außerdem in den Genuss von Specials wie Rabatt-Codes für meinen Etsy Shop in dem ich Patchworkanleitungen verkaufe! Anmelden kannst du dich im Anmeldeformular unten.
I hope you’ve enjoyed my tutorial and I can’t wait to see your blocks! Sign up to my newsletter for updates on the 6 Köpfe 12 Blöcke Quilt-Along below. As a subscriber you’ll also enjoy coupon codes for my Etsy shop!
Im März geht es bei Verena weiter mit dem dritten Block – bis dahin liebe Grüße und viel Spaß beim Nähen!
In March Verena will be back with block number three – until then have a great time!
xoxo Nadra