
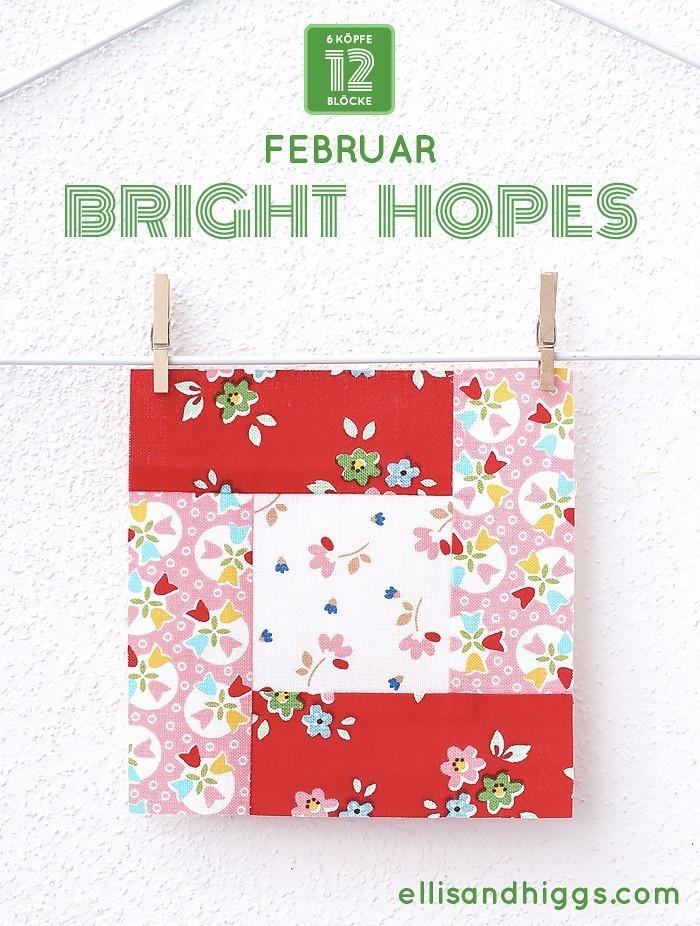
Hallo und willkommen zum Februar Block des 6 Köpfe 12 Blöcke – Quilt Alongs, dem Bright Hopes Quilt Block! Diesem Muster bin ich schon ganz zu Beginn meiner Patchwork-Karriere verfallen und finde es heute noch genauso toll! Der Bright Hopes Quilt Block ist schlicht, aber wirkungsvoll und sehr einfach herzustellen. Er wird mit Hilfe von Teilnähten (im Englischen: “partial seams”) genäht, eine Technik, die man nicht all Tage verwendet. Wenn du dir meine ersten Bright Hopes Blöcke genau ansiehst, kannst du erkennen, dass ich damals noch keinen blassen Schimmer von Teilnähten hatte – ich weiß noch, wie ich damals dachte, dass ich die Blöcke am Ende schon irgendwie zusammengenäht bekomme 🙂
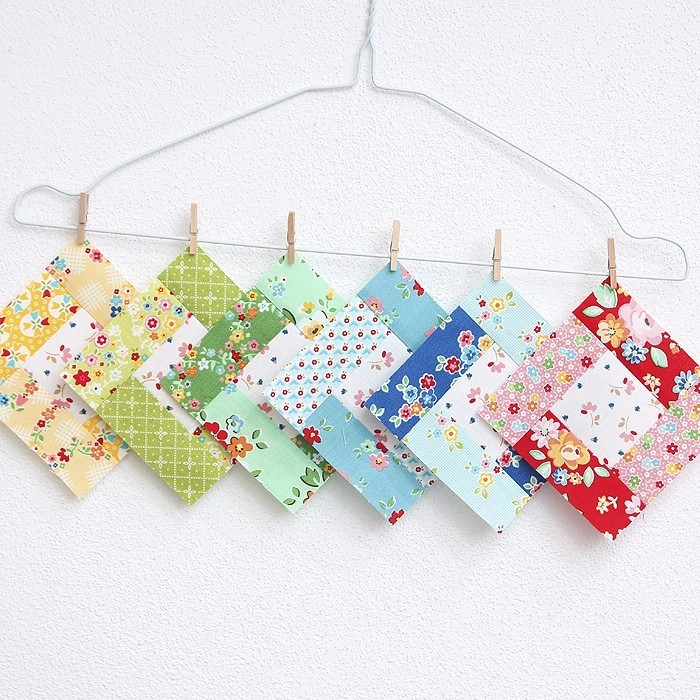
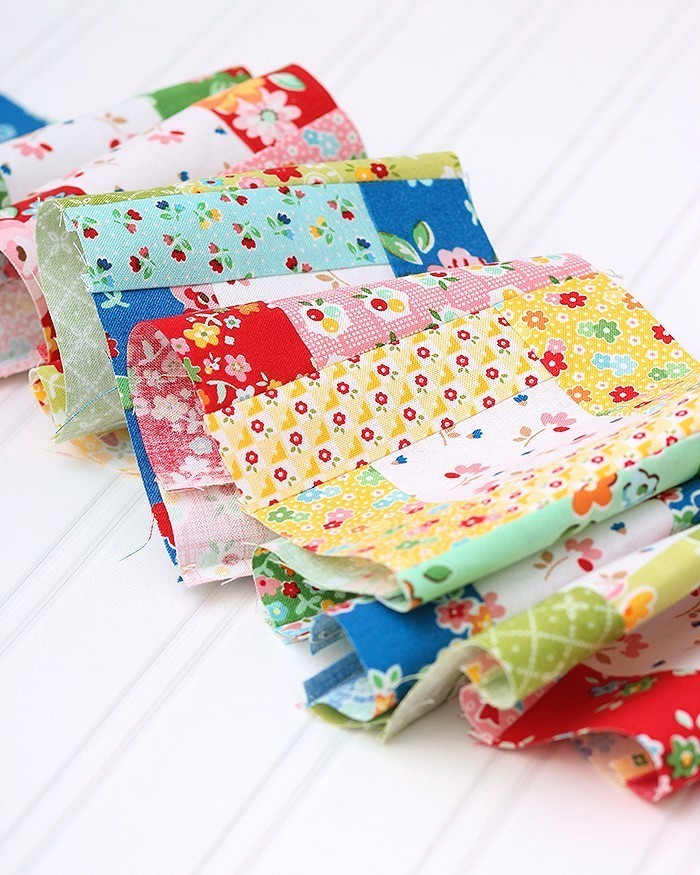
Wie im letzten Jahr nähe ich hauptsächlich mit den Stoffen, die ich für die Firma Riley Blake Designs entworfen habe. Bis zum Frühsommer mit den Stoffen aus meinen drei vergangenen Kollektionen und wenn meine neue Kollektion Mon Beau Jardin herauskommt, auch mit den neuen Mustern (auf Instagram habe ich kürzlich ein Bild von den ersten Probedrucken gezeigt – das Warten fällt wirklich schwer!). Für meinen Quilt verwende ich Low Volume Stoffe als Hintergrund, und für die Blöcke alle Farben, die in meinen Kollektionen vorkommen – pro Quilt Block jeweils ein Farbton in zwei Schattierungen. Mein Quilt soll ganz bunt und sommerlich werden!
Für alle die neu sind hier: der 6 Köpfe 12 Blöcke – Quilt Along ist ein Gemeinschaftsprojekt meiner “quilting peeps” Dorthe, Andrea, Katharina, Gesine, Verena und mir. Letztes Jahr haben wir einen Quilt mit 12 klassischen Blöcken genäht, dieses Jahr machen wir einen Row-by-Row Quilt. Am Anfang jeden Monats stellen wir einen neuen Block vor und zeigen dir wie du ihn nähst, vervielfältigst und zu einer neuen Reihe für den Quilt zusammensetzt. Wenn du bei diesem Jahresprojekt mitnähen möchtest, dann mach dich am besten vorher auf diesen beiden Seiten schlau:
→ 6 Köpfe 12 Blöcke – ALLGEMEINE INFORMATIONEN und LINKS ZU DEN TUTORIALS
→ 6 Köpfe 12 Blöcke – EINFÜHRUNG und ALLE INFORMATIONEN ZUM QUILT
Ich behandle meine Stoffe gerne mit Sprühstärke vor, das macht sie stabiler und vereinfacht das Zuschneiden und Nähen enorm. In dieser Anleitung zeige ich dir, wie das geht:
→ Präzision durch Sprühstärke
So und jetzt geht’s aber los!
Hello and welcome to month two of the 6 Köpfe 12 Blöcke quilt along! Today I’m showing you how to make the Bright Hopes Quilt Block, a fun and easy pattern that is assembled using partial seams. The Bright Hopes block was one of my very first quilting projects – if you take a close look you can tell, that I had never heard of partial seams before…! 🙂 I still love this pattern, it’s simple, yet striking and very easy to make.
For my quilt I will be using the fabrics that I’ve designed for Riley Blake Designs. Until my new line Mon Beau Jardin is out this summer (have you seen the first strike offs yet? Oh, I can’t wait!), I will be using fabrics from my previous lines. I will use low volume prints for the background and each two different shades of one color per block. I want to make a beautiful bright and colorful summer quilt!
In case you don’t know, what I’m talking about: the 6 Köpfe 12 Blöcke quilt along is a joint project by me and my quilting peeps Dorthe, Andrea, Katharina, Gesine, and Verena. Last year we made a quilt with 12 traditional quilt blocks and this year we will make a row by row quilt. On the 1st of each month we will present a new block and show you how to make it. If you’d like to join us, you can read all about the quilt along here:
→ 6 Köpfe 12 Blöcke – GENERAL INFOS and TUTORIAL LINKS
→ 6 Köpfe 12 Blöcke – INTRODUCTION and INFOS ABOUT THE QUILT
I always prepare my fabrics by starching them – it just makes cutting and sewing easier, especially if you’re working with small pieces. In this tutorial I’m showing you how to starch your fabrics:
→ Präzision durch Sprühstärke
And now, let’s get started!
Bright Hopes Quilt Block
Block Größe: unvernäht 4 ½″, vernäht 4″. Insgesamt nähen wir 15 Blöcke. Die Nahtzugabe (in den Schnitteilen enthalten!) beträgt ¼″ und wird in Richtung der angezeigten Pfeile gebügelt. Um die Blöcke und Reihe zu planen, kannst du dir das Ausmalblatt ausdrucken:
Size of the block: unfinished 4 ½″, finished 4″. We will make a total of 15 blocks. Use a ¼” seam allowance and press the seams as shown by arrows. Print out the coloring page to plan your blocks and row.
→ Bright Hopes AUSMALBLATT / COLORING PAGE
Bitte lies dir das Tutorial einmal komplett durch, bevor du beginnst.
Please read all instructions before you begin.
Materialien / Materials
Stoffe:
- Hintergrundstoff (hier Weiß): 3″ x 3″ für 1 Block / 1 Fat Eighth (9″ x 21″) für 15 Blöcke
- Heller Stoff (hier Rosa): 3 ½” x 4″ für 1 Block / ca. 1 Fat Quarter (18″ x 21″) für 15 Blöcke
- Dunkler Stoff (hier Rot): 3 ½” x 4″ für 1 Block / ca. 1 Fat Quarter (18″ x 21″) für 15 Blöcke
Die Angaben für die bunten Stoffe sind großzügig bemessen und erlauben eventuellen Verschnitt.
Fabrics:
- Background fabric (white): 3″ x 3″ for 1 Block / 1 Fat Eighth (9″ x 21″) for 15 blocks
- Light fabric (pink): 3 ½” x 4″ for 1 Block / 1 Fat Quarter (18″ x 21″) for 15 blocks
- Dark fabric (red): 3 ½” x 4″ for 1 Block / 1 Fat Quarter (18″ x 21″) for 15 blocks
I have calculated the amount for the blocks rather generously to allow for cutting errors.
Zuschnitt / Cutting
Hintergrundstoff:
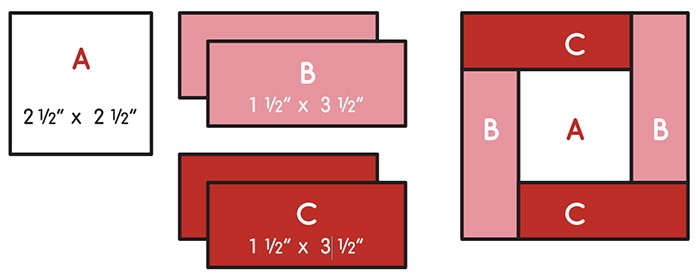
- (1) 2 ½″ x 2 ½″ Quadrat (A) für 1 Block / (15) Quadrate für 15 Blöcke
Heller und dunkler Stoff:
- (2) 1 ½″ x 3 ½″ Rechtecke (B) / 30 Rechtecke für 15 Blöcke
- (2) 1 ½″ x 3 ½″ Rechtecke (C) / 30 Rechtecke für 15 Blöcke
Background fabric:
- (1) 2 ½″ x 2 ½″ square (A) for 1 Block / (15) squares for 15 blocks
Light and dark fabric:
- (2) 1 ½″ x 3 ½″ rectangles (B) / 30 rectangles for 15 blocks
- (2) 1 ½″ x 3 ½″ rectangles (C) / 30 rectangles for 15 blocks
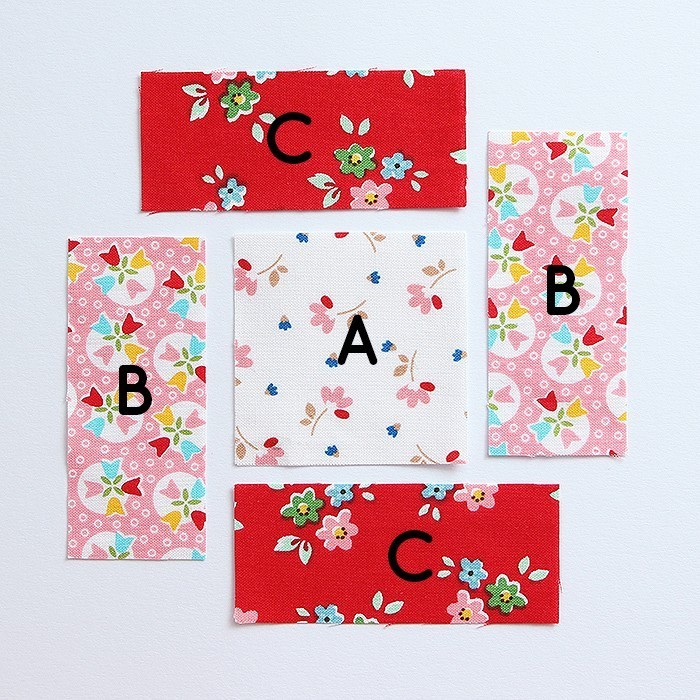
Hier siehst du die mit Buchstaben gelabelten Schnittteile. Auf dem Quilt Block siehst du nochmal genau, wo sich welches Schnittteil befindet:
Here are the pieces and the quilt block labeled with the letters:

Anleitung / Instructions
1. und 2. Ein C Rechteck wie dargestellt rechts auf rechts auf das A Quadrat legen und an der oberen und rechten Schnittkante ausrichten. Beide Teile von der Mitte aus beginnend, in Richtung der ausgerichteten Schnittkanten mit einer Nahtzugabe von ¼″ zusammennähen.
3. Anschließend nach außen bügeln.
4. So sollte deine Einheit jetzt aussehen: ein Stück der Naht ist quasi noch “offen” und das C Rechteck ragt an der linken Seite über das A Quadrat heraus.
1. and 2. Layer a C rectangle on the A square as shown, rights sides together. Line up the top and left cutting edges and stitch your first seam, starting about halfway down from the center.
3. Press towards the dark fabric.
4. You have created a partial seam and this is how your unit should look like.
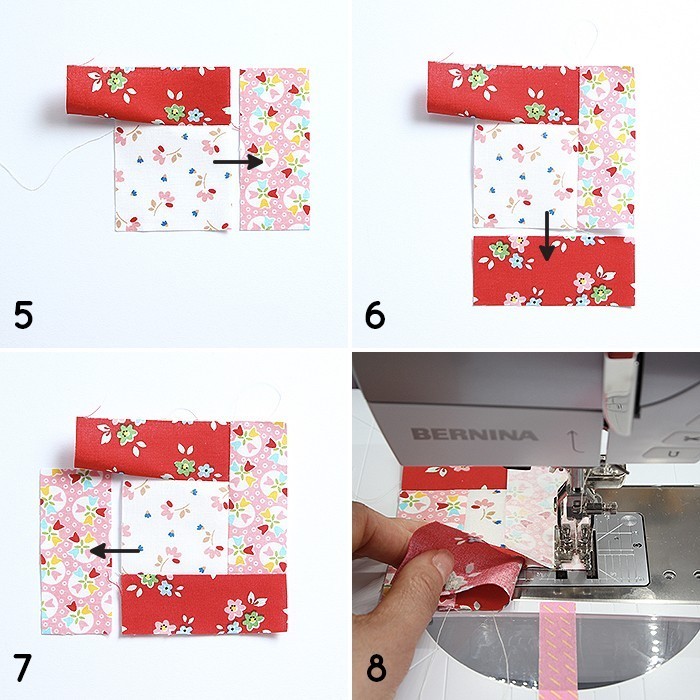
5. Ein B Rechteck an die rechte Seite der Einheit nähen und anschließend nach außen bügeln.
6. Das zweite C Rechteck an die untere Seite der Einheit nähen und anschließend nach außen bügeln.
7. Das zweite B Rechteck an die linke Seite der Einheit nähen und anschließend nach außen bügeln.
8. Halte dir das überhängende erste C Rechteck zur Seite, damit es beim Nähen nicht in Weg ist.
5. Sew a B rectangle to the right side of the block unit and press towards the dark fabric.
6. Sew the second C rectangle to the bottom of the block unit and press towards the dark fabric.
7. Sew the second B rectangle to the left side of the block unit and press towards the dark fabric.
8. When stitching your last seam, make sure to hold the overlapping C rectangle to the side.
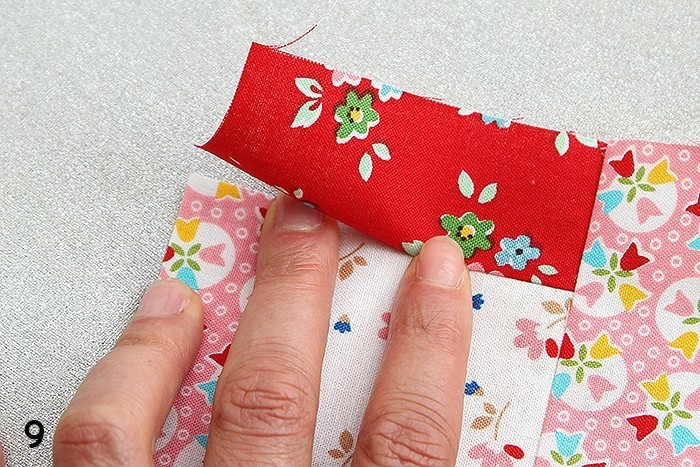
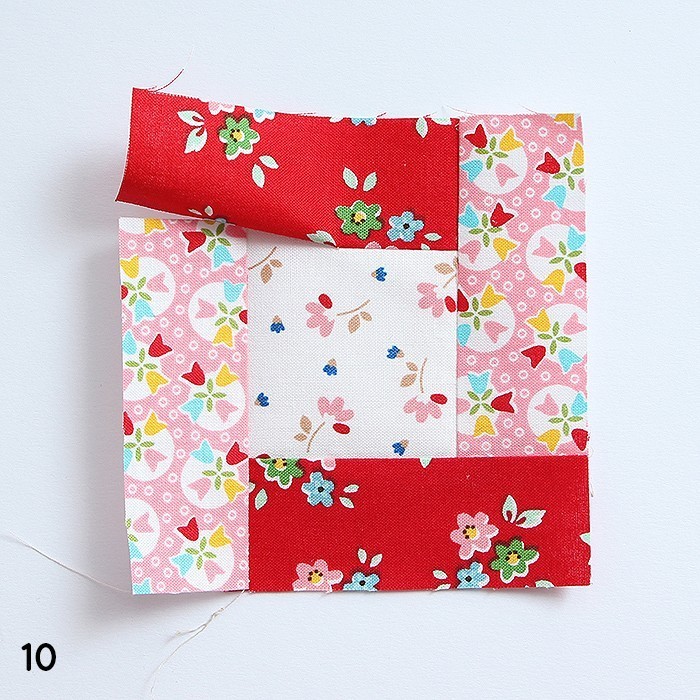
9. und 10. So sollte deine Einheit jetzt aussehen. Das überhängende erste C Rechteck kann jetzt festgenäht werden.
9. and 10. This is how your unit should look like. Now you can attach the overlapping C rectangle to the unit.
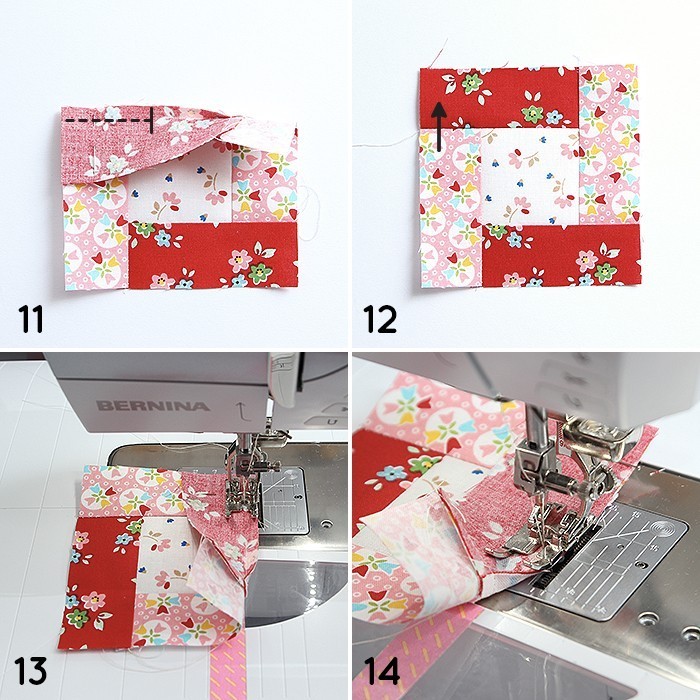
11. Das linke Ende des ersten C Rechteck wie dargestellt rechts auf rechts auf die Einheit legen, an der oberen und linken Schnittkante ausrichten und mit einer Stecknadel fixieren. Anschließend beide Teile zusammennähen, etwa 1 cm über den Anfang deiner der ersten Naht hinaus (so werden die Nähte automatisch verriegelt) und somit die offene Naht schließen.
12. Anschließend nach außen bügeln.
13. und 14. Die letzte Naht fällt dir am Anfang eventuell nicht ganz so leicht. Wie du sehen kannst, näht man hier in Richtung mehrerer Stofflagen, was eine knubbelige Angelegenheit ist – hier hilft es vielleicht, mehr Stecknadeln zu verwenden und die rechte Ecke der Einheit beim Nähen ganz umzuklappen und gut festzuhalten.
11. Place the left end of the first C rectangle on the unit as shown, lign up the top and left cutting edges and pin in place. Now start sewing and stop at the point where your partial seam ends.
12. Press towards the dark fabric.
13. and 14. This last seam might seem a bit difficult. Use more pins and make sure to firmly hold down the folded right end of the block while sewing.

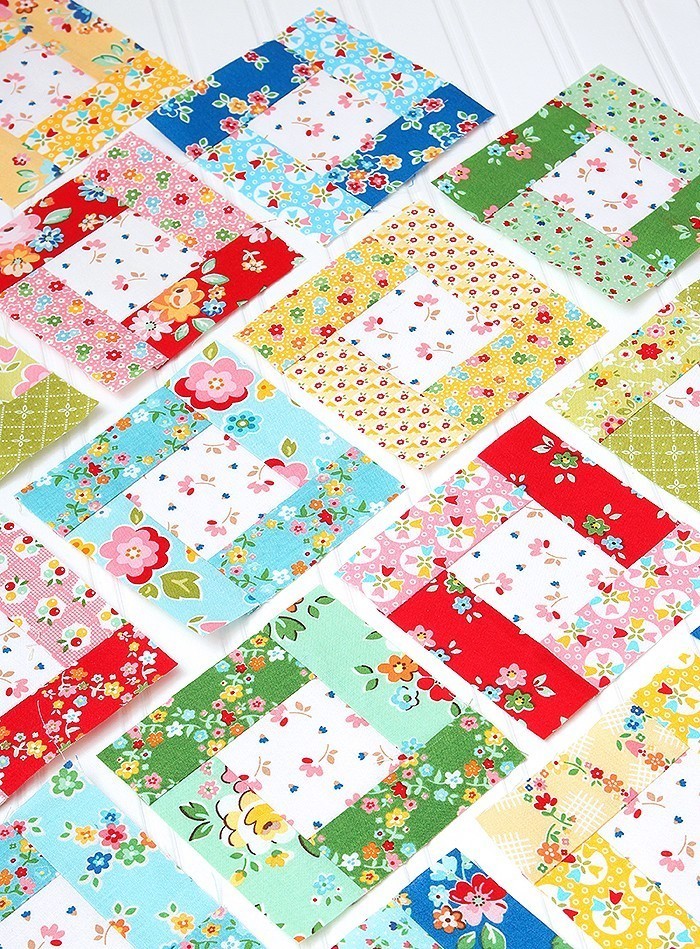
Und fertig ist dein Bright Hopes Quilt Block! Gar kein Hexenwerk, oder? Der Block sollte eine Größe von 4 ½″ x 4 ½″ haben.
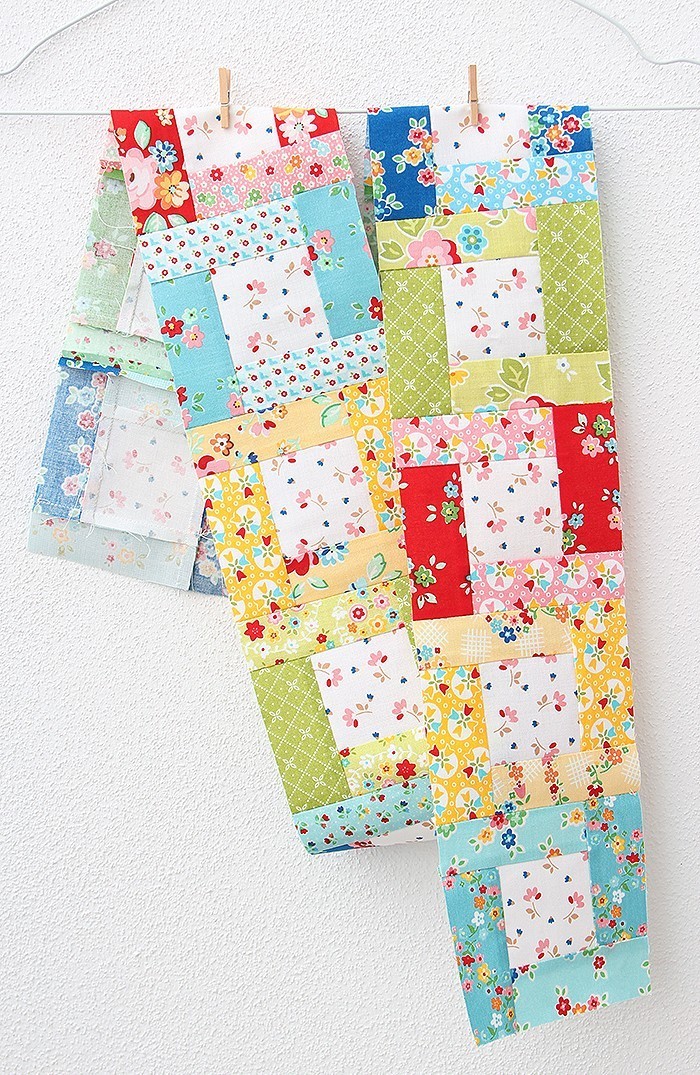
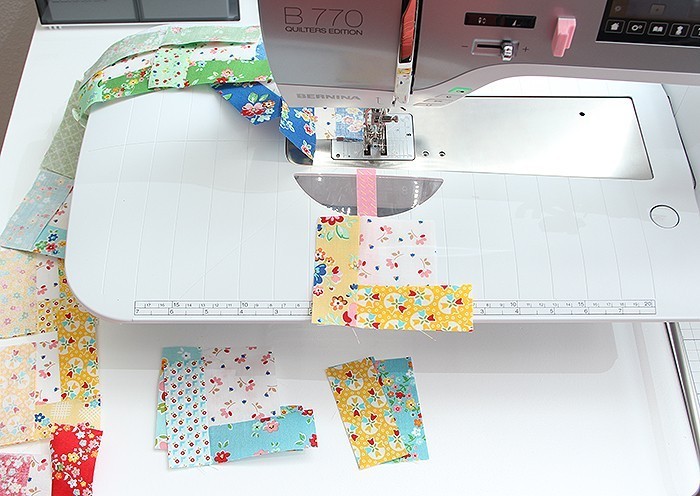
Beim Herstellen der 15 Blöcke, die du für diese zweite Reihe brauchst, bietet es sich an Kette zu nähen (Verena hat eine wunderbare Anleitung dazu geschrieben). Nur die letzte Naht, die ja quasi mitten drin endet, muss für jeden Block einzeln genäht werden. Anschließend alle 15 Blöcke zu einer Reihe zusammennähen. Die fertige Reihe sollte 4 ½″ x 60 ½″ messen.
And your Bright Hopes Quilt Block is finished – wasn’t too difficult, was it? Your block should measure 4 ½″ x 4 ½″ When joining your blocks to a row, I recommend chain piecing whenever possible to speed up production and save thread. The finished row should measure 4 ½″ x 60 ½″.
Ich hoffe es hat dir Spaß gemacht und ich freue mich, deine Werke zu sehen! Wie auch im letzten Monat gibt es eine LINKPARTYund es wäre toll wenn du deinen Block hier verlinkst. Dazu auf den blauen Button unten links klicken und den Anweisungen auf der Inlinkz-Seite folgen. Bitte nicht vergessen, den Backlink zu meinem Blog in deinen Blogpost einzufügen und bitte nur Blogs verlinken! Wenn du nicht weißt wie das geht, schau mal bei Katharina vorbei, sie hat das toll beschrieben). Danke!
I hope you’ve enjoyed this tutorial and I can’T wait to see your blocks! Feel free to add your image to the Inlinkz link-up (you’ll find the blue button on the very end of this page). Please make sure to only add blog-links! Thanks!
Über meinen Newsletter bleibst du immer auf dem neuesten Stand über alles, was hier passiert. Als Abonnent kommst du außerdem in den Genuss von Freebies und Coupon Codes für meinen Etsy Shop in dem ich Nähanleitungen für Quilts und Accessoires verkaufe! Anmelden kannst du dich im Anmeldeformular unten.
Sign up to my newsletter for updates on the 6 Köpfe 12 Blöcke Quilt-Along below. As a subscriber you’ll also enjoy freebies and coupon codes for my Etsy shop!
xoxo
Nadra

[inlinkz_linkup id=763741 mode=1]